This blog serves as an instructional resource that will show you how to develop a to-do application in Golang. I’ll demonstrate my point with a straightforward project with four APIs for your to-do app: POST, PUT, DELETE, and GET. I utilized the Postman Application to test our application. Since the major subject of this blog will be the Back End and how to make your code operational, I won’t go into the Front End description. But to make things plain, I’ll start with the fundamentals. So let’s get started on the project.
Prerequisites
Before proceeding, You need to prepare with a few basics of Go Programming Language like Functions, Parameters, Arguments, Structs, etc. Apart from basic concepts of Golang, you should be aware of What is API and RestAPI. For this project, I will be using MongoDB for my database and connecting it with my To-Do Application. Next, I will be using the Postman Application to test my APIs instead of the renderer. You can also use it for a better understanding. You should have Go Program installed on your system. These were the basic requirements that you need to be prepared with before proceeding with this tutorial blog.
The process of creating a Directory
In this section, I will explain the process to create the directory. A directory is nothing but, where you store your code and other dependent files. First, you need to hit the command prompt and mention a command i.e., “cd Desktop”. This command will navigate you to the desktop and then you can create your project directory over there by a command input i.e., “mkdir Todo-Golang”.
I have named my directory Todo-Golang, you can call it according to your choice. After creating it we need to navigate to that directory, for this we will input “cd Todo-Golang” in the command prompt. After this step, the system will navigate you to the project directory you have made for yourself. The next step includes the installation of go mod file, therefore to install go mod file you will input “go mod init github.com/golangcompany/Todo-Golang.
Here, “golangcompany” is my username for github and Todo-Golang is the repository, I want to create for my project on Github. The final steps for this section include importing external packages like Gin, MongoDB Driver, etc. Therefore, I have listed those commands, please go through them, and then, we will begin to write the code for the Todo Project.
“go get go.mongodb.org/mongo-driver/mongo”
“go get github.com/gin-gonic/gin”
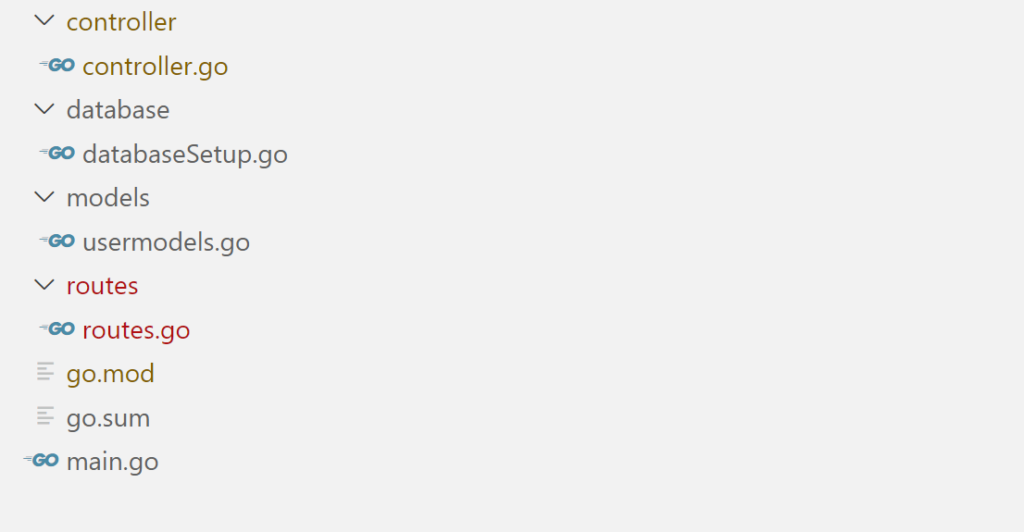
The first driver is for mongo drivers, and the second one is to import the gin web framework. This is it for now, in the next section, I will start with the code. So mention the command “code .” which will pop up the IDE on your screen and then proceed and create the folders as mentioned in the image below (Please Refer to Image 1).
Creating the Struct

If you don’t know what a struct is then let me explain that first to you. Basically, a struct or structure is a collection of different fields. Like, suppose you want different data sets and types to be inserted by the client then you need to create variables for it. But in Go, you can define your type and use it. This is how struct works. In the struct for my Todo application, I have mentioned the fields like ID, Title, Completed, and CreatedAt.
I have mentioned the types for each field i.e., for Title and Completed, I have mentioned the Datatype as String and for CreatedAt I have mentioned time.Time is again an internal package from go that you need to import when you are including date or time in your program.
Writing main.go
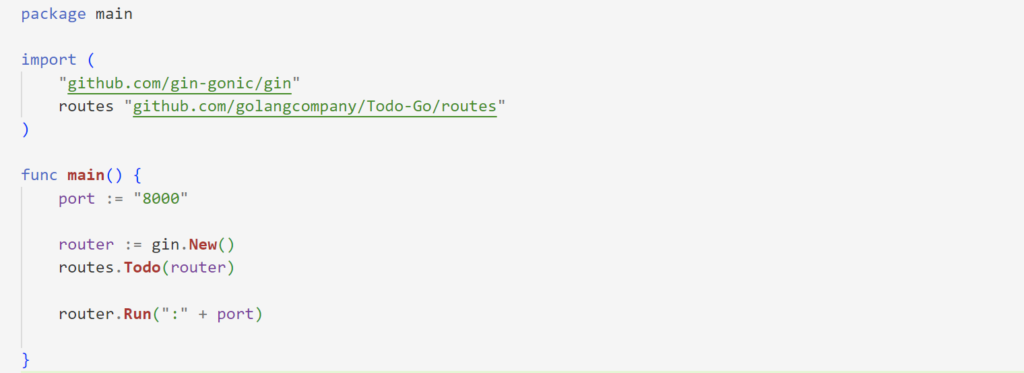
Here, in my main.go file, I’ve written out my main function in which I’ve specified the port explicitly and mentioned a variable called a router that has “gin,” asking it to return a brand-new instance of the Engine that is completely empty and has no middleware attached.
Then I invoked the Todo function from the routes package and gave it the router argument, telling it to start the server. As an argument, it accepts a port number and listens on that port.
For a clear understanding please follow the code in Image 3 mentioned below.
Setting Up Database In MongoDB
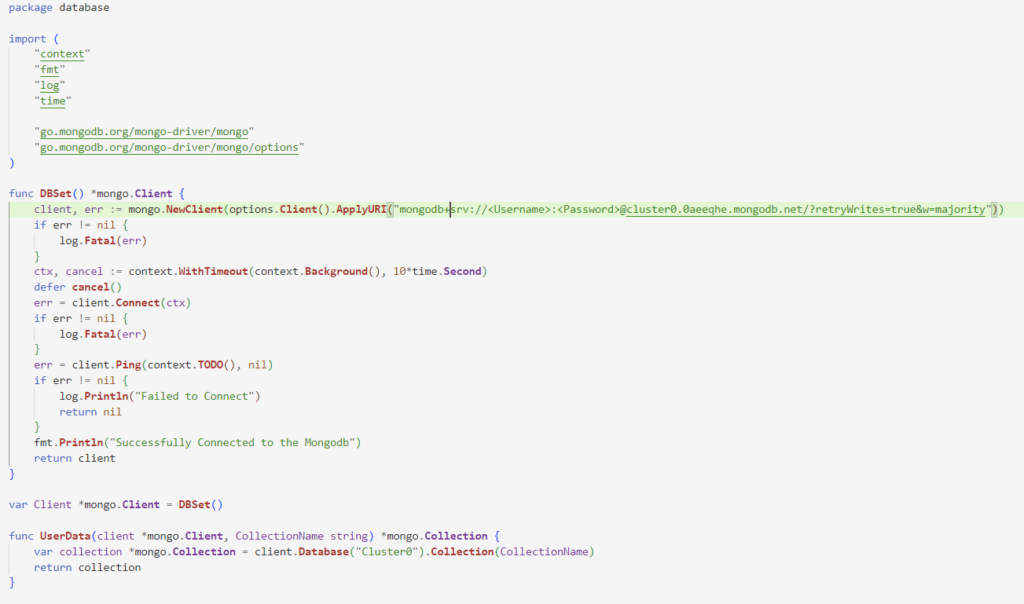
Here, the code in Image 4 is used to connect to a mongodb database. It uses the mongo-driver package. The function DBSet() returns a client object which is then stored in the variable Client. This client object can be used to access any collection in the database. The purpose of this code is to connect to a mongodb database and access the collections in it.
While you write the code you also need to fetch the connection string from MongoDB Atlas, for that you can follow my other blog that will give you a clear understanding of how you can connect your Golang Application with the MongoDB Atlas Database.
Establishing Routes and Controllers
I’ll go over what’s in the routes and controllers folder in the project’s main directory in this part. Let’s go on to the routes folder, which contains the routes.go. Kindly adhere to the code in Image 5, given below.

Firstly, I have imported the package for Gin and controllers in the current file. Then, I mentioned a function called Todo. This is a function that takes in an argument of type *gin.Engine and returns nothing. It sets up the routes for our API. There are four APIs that I have mentioned in routes for our Todo Application i.e., GET, PORT, PUT, and DELETE that I have defined in the controllers.
So let us proceed toward writing the code for controllers. Before proceeding toward the controllers, please have a look at Image 6 placed below for better clarification.

In controllers, I first mentioned imports in the controller. Then I declared a variable of type mongo.collection called TodoCollection. The variable’s value is the result of calling the function database. database.Client and “TodoList” as parameters to UserData. The term “TodoList” refers to the name of the collection that will be created automatically in your database.
Then I have defined the four functions that I called them previously in the routes.go file. My first function here will be the FetchTodo Function. Please refer to image 7 under that image, you can find the explanation as well.
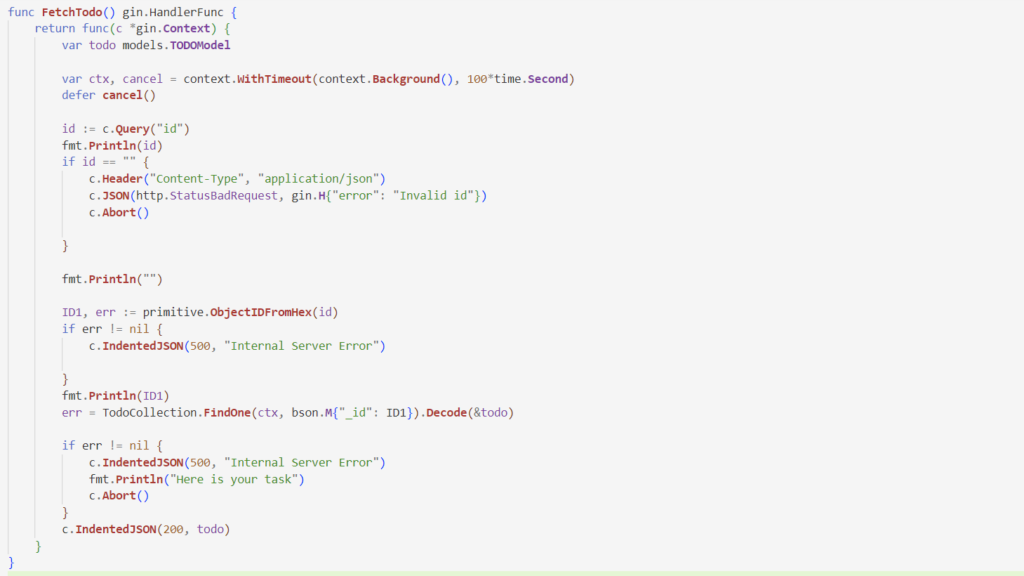
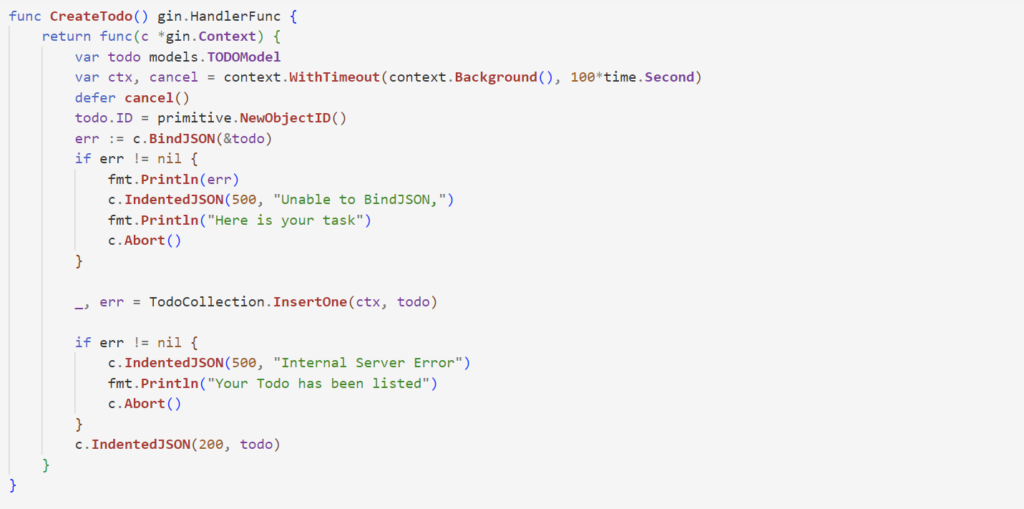
This is a function named FetchTodo, that fetches a todo from the database. It takes in an id and returns the todo with that id. Next is the CreateTodo Function, which creates a new todo. It takes in the request body and binds it to the variable todo. Then, it inserts the data into the database. Please refer to the code below in Image 8.
Next is the Update Function, which updates the to-do list. It takes in the id of the task and then updates it with the new title and completed status. If you notice the Image 9, here, bson.M is a type that represents a BSON document. It is a map[string]interface{} with special marshalling behaviour into BSON. The empty value for an M type is an empty document, represented as bson.D{}.
Next, I will proceed with my last API which is the DELETE API for which I need to define the DeleteTodo Function. This is a function that deletes a todo task from the database. It takes in an id as input and deletes the corresponding document from the database (Refer to Image 10).
From the above explanation, you can develop the backend for your todo app. You can also develop a golang mobile app with the support of the theories above.
![[Image 9]](https://technicalnick.in/wp-content/uploads/2023/01/Image-9-1024x682.png)
![[Image 10]](https://technicalnick.in/wp-content/uploads/2023/01/Image-10-1024x538.png)
Testing Your Application
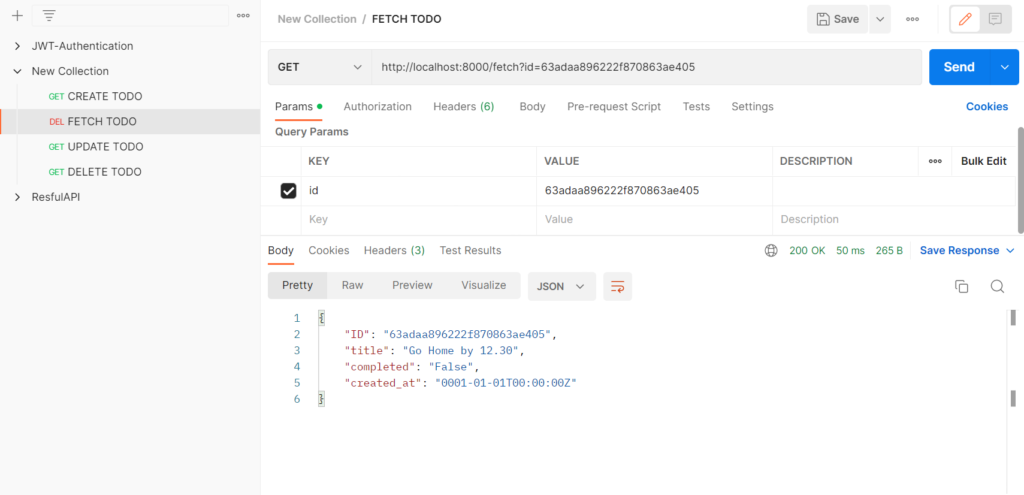
You must now use the Postman Application to access the APIs in order to test your ToDo Application. I’ve included some screenshots of my Postman Application testing for your convenience. You can refer to those Images for a better understanding of testing your Golang Application. I hope you gain some benefits from this blog (Please Refer to Images 11,12,13 & 14).
![[Image 11]](https://technicalnick.in/wp-content/uploads/2023/01/Image-11-1024x498.png)
![[Image 13]](https://technicalnick.in/wp-content/uploads/2023/01/Image-13-1024x500.png)
![[Image 14]](https://technicalnick.in/wp-content/uploads/2023/01/Image-14-1024x501.png)
To Read More Tech Blogs Visit: Technical Nick


